NexT主题优化
添加动态线条背景
在博客根目录下的
source\_data文件夹(如果没有,则创建一个_data文件夹)中创建一个新的文件命名为footer.njk。在
footer.njk文件中添加如下内容:<script color="0,0,255" opacity="0.5" zIndex="-1" count="99" src="https://fastly.jsdelivr.net/npm/canvas-nest.js@1/dist/canvas-nest.js"></script>你还可以自定义这些属性:
- color:线条的颜色
- opacity:线条的透明度
- zIndex:层叠顺序,数字小的显示在下面,使用默认值就行
- count:点的数量
在主题配置文件
_config.yml中取消footer前面的注释。custom_file_path: footer: source/_data/footer.njk
添加文章结束标记
- 在博客根目录下的
source\_data文件夹中创建一个新的文件命名为post-body-end.njk。 - 在
post-body-end.njk文件中添加如下内容:<div> {% if not is_index %} <div style="text-align:center;color: #ccc;font-size:14px;">-------------本文结束<i class="fa fa-paw"></i>感谢您的阅读-------------</div> {% endif %} </div> - 在主题配置文件
_config.yml中取消postBodyEnd前面的注释。custom_file_path: postBodyEnd: source/_data/post-body-end.njk
添加订阅文章通知功能
参考链接:https://cloud.tencent.com/developer/article/1622392
添加 utterances 评论系统
参考链接:https://blog.csdn.net/weixin_43641850/article/details/105284634
防止每次 hexo clean 后 CNAME 文件被删除
- 安装
hexo-generator-cname模块:npm install hexo-generator-cname --save - 在站点配置文件
_config.yml中修改Plugins为hexo-generator-cname:Plugins: - hexo-generator-cname - 在站点配置文件
_config.yml中修改url为你的自定义域名:url: https://www.tongjiebin.cn
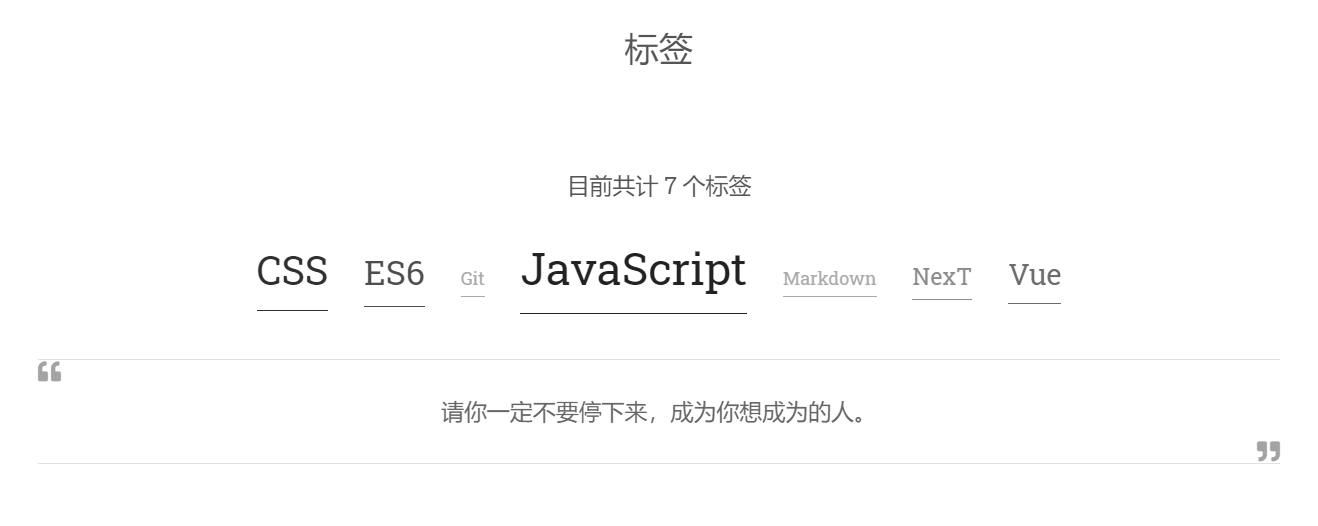
在标签/分类页添加引用
在 themes\next\layout\_partials\page 目录下的 categories.njk 和 tags.njk 里加上:
<blockquote class="blockquote-center">请你一定不要停下来,成为你想成为的人。</blockquote><blockquote> 标签在所有的 markdown 文档中都可以添加。
效果图如下:
浮层样式集合
在 source\_data\footer.njk 文件中,添加下面的代码即可实现对应的样式。
<!-- 浮层上出现🌸飘落 -->
<script src="https://fastly.jsdelivr.net/gh/tinfy/blog-cdn/js/sakura.js"></script>
<!-- 鼠标痕迹星星坠落 -->
<script src="https://fastly.jsdelivr.net/gh/tinfy/blog-cdn/js/cursor-star.js"></script>
<!-- 鼠标点击出现爱心 -->
<script src="https://fastly.jsdelivr.net/gh/tinfy/blog-cdn/js/cursor-love.js"></script>
样式的修改
- 去掉博客顶部的黑线
根据主题配置文件 _config.yml 里设置的主题,在 themes\next\source\css\_schemes 目录下,找到对应主题的 index.styl 样式文件。例如我设置的主题是 Gemini,那么我的主题样式文件的路径就是 themes\next\source\css\_schemes\Gemini\index.styl。

找到这个文件后,在最后面添加上如下的样式:
// 黑线的类名就是 headband,可以通过在浏览器中按 F12 找到
.headband {
  display: none;
}- 添加圆角
同样是修改 themes\next\source\css\_schemes\Gemini\index.styl 文件,把 border-radius: $border-radius-inner; 和 border-radius: $border-radius; 改为 border-radius: 5px;
.main-inner > {
  .sub-menu, .post-block, .tabs-comment, .comments, .pagination {
    background: var(--content-bg-color);
    // 第一处修改
    // border-radius: $border-radius-inner;
    border-radius: 5px;
    box-shadow: $box-shadow-inner;

    &:not(:first-child):not(.sub-menu) {
      // 第二处修改
      // border-radius: $border-radius;
      border-radius: 5px;
      box-shadow: $box-shadow;
      margin-top: $sidebar-offset;

      +tablet() {
        margin-top: $content-tablet-padding;
      }

      +mobile() {
        margin-top: $content-mobile-padding;
      }
    }
  }
}
在最后面添加如下代码,这是给侧边栏和代码块也添加上圆角。
.sidebar-inner, .header-inner, .line-numbers {
  border-radius: 5px;
}- 修改背景色
修改博客标题处和向上跳转按钮以及 GitHub Logo 的背景色,在 index.styl 文件中添加:
.site-brand-container, .back-to-top {
  background-color: #5192FE;
}
.github-corner svg {
  fill: #5192FE;
}
动态站点标签页标题
在 themes/next/layout/_layout.njk 文件中添加如下内容:
<script type="text/javascript">
    var OriginTitile = document.title,
        st;
document.addEventListener("visibilitychange", function () {
    document.hidden ? (document.title = "╭(°A°`)╮ 页面崩溃啦 ~", clearTimeout(st)) : (document.title =
                                                                                 "(ฅ>ω<*ฅ) 噫又好了~", st = setTimeout(function () {
        document.title = OriginTitile
    }, 2000))
})
</script>
添加 Waline 评论系统
参考:Waline快速上手
最后把 HTML 引入到博客中,需要把这一段代码复制到 themes/next/layout/_layout.njk 文件的 class="main-inner" 这个 div 里面。
<div class="main-inner {% block class %}{% endblock %}">
    {%- include '_partials/header/sub-menu.njk' -%}
    {% block content %}{% endblock %}
    {%- include '_partials/comments.njk' -%}

    <script src="//cdn.jsdelivr.net/npm/@waline/client"></script>
    <div id="waline"></div>
    <script>
        Waline({
        el: '#waline',
        serverURL: 'https://your-domain.vercel.app',
        });
    </script>
</div>
2022/6/4 更新:
删掉 <script src="//cdn.jsdelivr.net/npm/@waline/client"></script>, 在 themes/next/layout/_layout.njk 文件的 <head> 标签中添加如下代码。
<script src="https://unpkg.com/@waline/client@v2/dist/waline.js"></script>
<link rel="stylesheet" href="https://unpkg.com/@waline/client@v2/dist/waline.css" />
把 <script> 下面的 <div> 和 <script> 标签都删掉,替换为如下代码。(这里其实不替换也行)
<div id="waline"></div>
<script>
    Waline.init({
        el: '#waline',
        // 这里填自己的地址,DEPLOYMENT和DOMAINS这两个地址好像都行
        serverURL: 'https://your-domain.vercel.app',
    });
</script>
添加自定义鼠标指针和自定义滚动条
在 themes/next/layout/_layout.njk 文件中添加如下内容:
<link rel="stylesheet" href="https://fastly.jsdelivr.net/gh/tinfy/blog-cdn/css/my_cursor.css">